Friday 6 February 2015

Lush Livingston Blogger Event

Well hi there! It's been a while my friends but what better reason to jump back into the blogosphere than an amazing Lush event?!

Last night, myself and 9 other local bloggers were invited along to our local Lush store for a preview of all this years Mothers Day goodies. I have never been so giddy in all my days. 

So after a glass of (non-alcoholic) fizz and a mini cupcake because, y'know, Thursdays are hard, we got down to the nitty gritty of the fab new releases!


Lots of lovely treats. Two bath bombs, three bubble bars, a shower gel, a body conditioner and some gift sets- so much to choose from! 


Mother Superior Bubble Bar

Rose Bubble Bar - it's inspired by Beauty and the Beast. Enough Said

Ultraviolet Bubble Bar


Secret Garden Bath Bomb
Now you may notice that theres a few photos missing- my only excuse is I was too busy sniffing things and dancing a happy dance to take photos of the beautiful Rose Bombshell bath bomb and the Yummy Mummy range. I have both in my possession so you'll be sick of the sight of them by the time I've finished reviewing.


They've also brought out beautiful gift sets - full of bath stuff to give mums a break and at a variety of price points so there really is something for everyone!

'Love you Mum' has some Love You Mum soap, Helping Hands hand cream (who doesn't love that bad boy, lets be honest) and one of the new offerings, the Secret Garden bath bomb. At £14.50, this is such an affordable set and perfect for that last minute dash the morning of Mother's Day! 

The second, bigger gift box is simply entitled 'Mum'. In this one we have the new Yummy Mummy shower gel and body conditioner - both of which have a heavenly sweet scent - with a selection of some old favourites. The Comforter bubbles bar and Blackberry bath bomb for a relaxing night in. Plus Vanilla Dee-Lite body lotion and Honey I Washed the Kids soap.
This is another amazing selection of products and, unlike some Lush sets, theres not a single thing in there you wouldn't use. All of them are absolutely gorgeous. And at £29.95, it's a really affordable treat for your lovely mum and better than flowers if you ask me!


Last but not least, we have The Mother's Day Tin. This is my personal favourite because it's all bath and four out of five products are new. The beautiful new Rose bubble bar, the Secret Garden bath bomb, the Ultraviolet bubble bar and Rose Bombshell are all beautiful new additions and I hope and I pray that they are made permanent! The last member of this family is the Sakura bath bomb which gives the most beautifully fizzy bath. Now this wasn't priced up yet but I imagine it will be around the same price as the 'Mum' gift box which makes it amazing value again. Good job Lush!


At this amazing event we also got to make our own Big Blue bath bomb and an Angels on Bare Skin cleanser, both of which we got to take home with us. The flabby staff also gave us a tour of their cosmetics range which I will confess to not knowing too much about but call me a convert because that stuff is good! We had our emotional brilliance colours done which is a really fun, wheel of fortune style thing but weirdly, the colours I picked were strangely relevant to how I was feeling yesterday…Mystic Meg's got nothing on Lush! 


So apparently the first colour you pick is your strength or weakness (I need more zen in my life for sure so spot on). The second is something you're looking for; I finish college in 3 months…security please?! Your last colour is (if I remember correctly) something you have and need to use more of; trusting my gut more often perhaps? Don't know if they're all colours I would wear - I love the middle eyeliner colour though! But it's a great fun concept and I'm glad someone is realising the power makeup has over the way we feel.
I plan to buy a few pieces in the range (to add to the beautiful lipstick they gifted us!) over the next few months so get ready for some reviews!

Basically, this was an amazing event and I will be spending my entire weekend in the bath.

What are your favourite lush products? Will you be treating your mum for Mother's Day?


Lauren x

Wednesday 3 September 2014

My Mini Lush Haul

I love Lush. What self respecting bath taker doesn't? Bubbles, melts, ballistics shower gels, face masks, moisturisers and even shampoos, though I've yet to venture to the corner of my local store...

Today I was in a bath frame of mind and doing a wee bit of a stock up of my favourites.


First up we have a Blue Skies bubble bar. I love this for when I'm feeling a bit stressed and only major bubbles will help. There's a gorgeous scent of patchouli in there and a hint of cinnamon which I think is why I love it so much. And you get a good 3-4 baths from it. Perfect

My second bubble bar choice was Amandopondo. This wee beauty is rose scented with a hint of orange and lemon to perk you up. It's eh...lush! Plus half a bar gives you this level of bubbles...so it's a good buy at £2.75

That fizzy wee number bottom right is another of my true loves- the butterball. This bath bomb is true perfection. I have quite dry skin, particularly if I've shaved my legs in the last year, and this wee guy is loaded with cocoa butter and leaves me feeling all smooth a moisturised. Plus it has ylang ylang which is super relaxing 

My last bath offering is a Dragon's Egg bath bomb. It makes your water gold and smells like lemon sherbet. It's gorgeous.

Lastly, no bath is complete without a face mask. I've had a cold the past week (violins) so my skin feels a bit sluggish and tired and blah. So I picked up my old friend Brazened Honey. It's a gentle exfoliator and still leaves my slightly sensitive skin feeling refreshed and quite plumped up which is something of a feat of engineering.

I love going a bit daft in Lush. So satisfying.

What are your favourites from Lush? Or just bathtime favourites generally? 

Saturday 30 August 2014

Bake Off Week 4- Desserts

I love a good pudding! This week I'm back in my comfort zone with one of my favourite recipes of all time- Lemon Pudding. It's an old family favourite and genuinely requested at like every party. Where it originally came from is beyond me so I'm going to cite my Gran as the source! It's a cheesecake type affair but not really since there's no cheese! Minimal ingredients and it took me all of 40 minutes to assemble- which included time out to take the top quality photos you've come to know and love! 

Ingredients 
Topping
200ml tub of whipping cream (this volume may be wrong...not a teeny one!) 
Tin of condensed milk
2 large lemons
Few drops of yellow food colouring (optional!)

Base (estimations!)
15(ish) digestive biscuits 
2 tablespoons golden syrup
50g butter

Greased round tin- preferably one with a loose bottom.

Optional: device to watch Extra Slice whilst you bake


1. Crush the biscuits. I use a rolling pin, you can use a food processor if you want extra washing up and a ridiculously smooth base. I've said 15 but I used 18 for this one and no one died...you can determine your own base thickness!

2. Melt the butter and golden syrup over a medium heat. Then stir it into the crushed biscuits. If it's still crumbly, melt more butter and syrup until it'll hold a shape. Transfer into the tin and flatten to make your base. Pop in the fridge to set whilst you make your topping.


3. Whip the cream until it's really quite firm- like past the soft peaks stage and into damn I've over whipped this. You'll be adding a lot of liquid later!


4. Zest and juice the two lemons. Add the juice, the condensed milk and a wee drop food colouring to the cream. And whip again.

5. Stir in the lemon zest until it's evenly distributed. If you whip it it'll all get stuck to the beaters so just use a spoon! 

6. Spread the topping evenly over the base and put back into the fridge to set. Lick all spoons and bowls and marvel in the speediness of this pudding! 


What's your favourite pudding? Are you enjoying the bake off this year?

Tuesday 26 August 2014

Bake Off Week 3- Bread

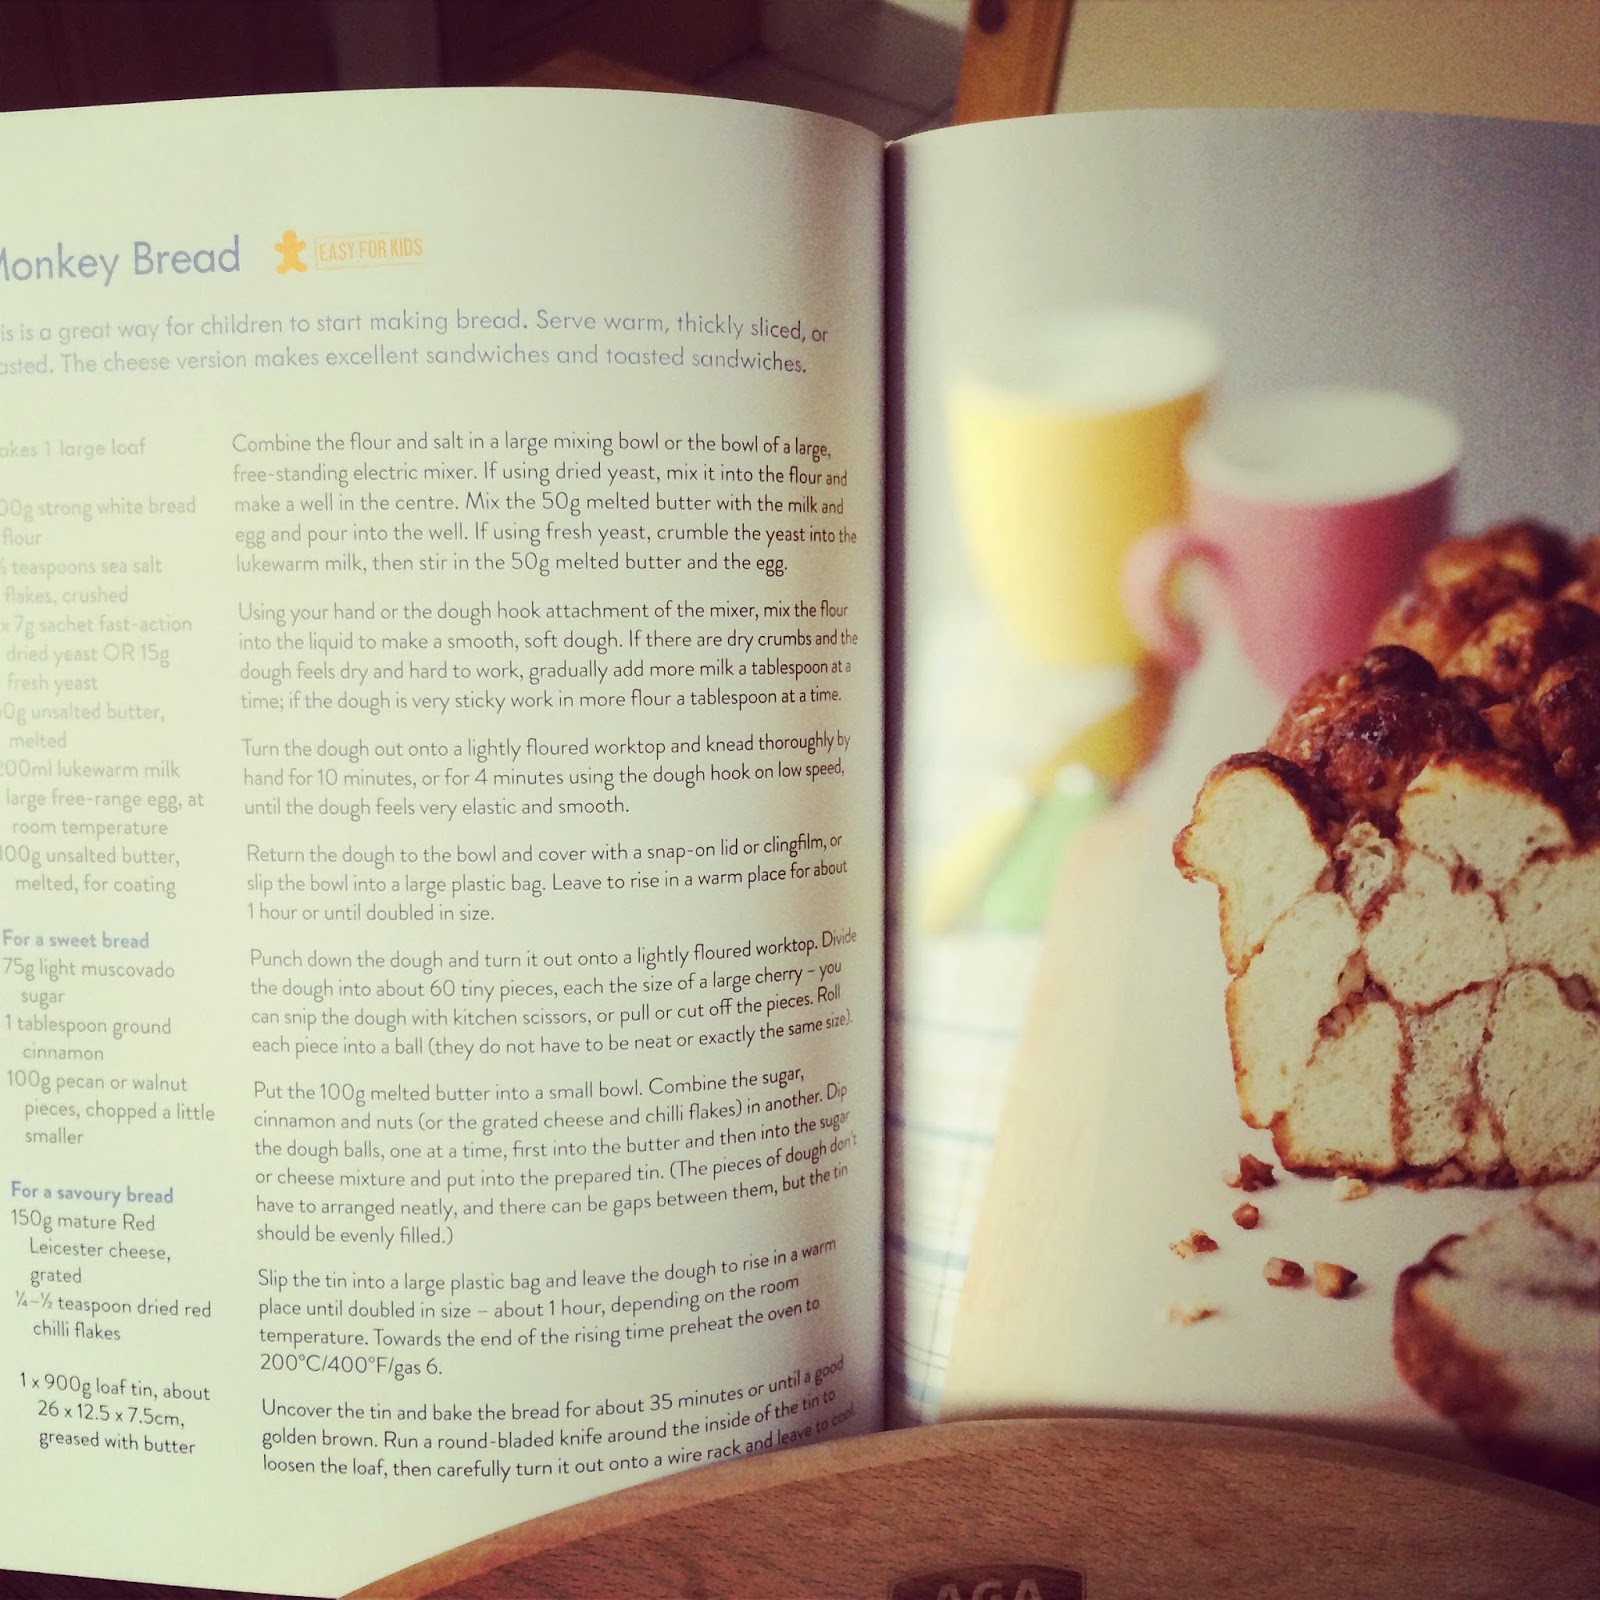
I know I declared my love for cake early on but my other favourite food group is bread. Rolls, loaves, brown, white or granary; I'm there. How I'm not yet the subject of a Channel 4 documentary called The Half Tonne Woman is beyond me. But anyway bread. Yum. I cracked open that fabulous Bake Off- How to Bake (by Linda Collister) book again and discovered the tempting treat- Monkey Bread. It also said it was good to make with kids and as someone who is useless with bread, this seemed like a good idea.

How hilariously wrong I was.


Ingredients (Makes 1 large loaf)

500g strong white bread flour
1 and a half tspns sea salt
1x7g sachet fast action dried yeast
50g unsalted butter, melted
200ml lukewarm milk (I zapped it in the microwave for about 25 seconds)
1 large free-range egg

For Coating
100g unsalted butter
75g light muscovado sugar
1 tablespoon ground cinnamon
100g pecan or walnut pieces, chopped a little smaller. (I missed these out but you fire on in there nut lovers!)

1 Large loaf tin, greased with butter or oil. For reasons you will see later on, I'd suggest using a liner. Lakeland do good ones here.


1. Combine the flour and salt in a large mixing bowl or in the bowl of a large free-standing electric mixer. If you're using dry yeast, mix it into the flour and make a well in the middle. 

1b. In a separate bowl, mix the melted butter, milk and egg.

2. This is where I like to pretend I'm Paul Hollywood and use my hand for the mixing, but you can be boring and use a mixer if you like. Pour the liquid into the well you created in the flour mixture and mix to make a soft smooth dough. If there are still dry crumbs then add a more milk, a little at a time. If it's the dough is really sticky, then add more flour, a little at a time.

3. Turn the dough out onto a lightly floured worktop and knead thoroughly by hand for a good 10 minutes. Hold one end of the dough with one hand, and with the heel of the other hand stretch the dough away form you. Fold the dough back in and give it a quarter turn, then repeat. Your arms should be sore by the time you're finished and the dough should feel elastic and smooth. Form it into a ball

4. Return the dough to the bowl and cover with cling film or a damp tea towel. Leave to rise in a warm place for about an hour or until doubled in size. My house is currently like the ice planet of Hoth so it took about 2 and a half hours. Joyful


5. Punch down the dough and turn it onto a lightly floured surface. Divide the dough into about 60 tiny pieces and roll each piece into a ball.

Hi I'm Lauren and I have OCD
6. Melt the 100g of butter in a small bowl. In another, combine the sugar, cinnamon and nuts. Dip each dough ball into the butter and then roll in the sugar mixture, before placing in the tin. They don't have to be arranged particularly neatly, there CAN be gaps, but fill the tin evenly.

7. Cover the filled tin with cling film and leave for ANOTHER hour in a warm place, until the balls have doubled in size. Near the end of this hour, preheat the oven to 200C/400F/gas 6.

8. Uncover the tin and bake for about 35 minutes or until a good golden brown. Run a round bladed knife around the inside of the tin to loosen the loaf, then carefully turn out onto a wire rack to cool.

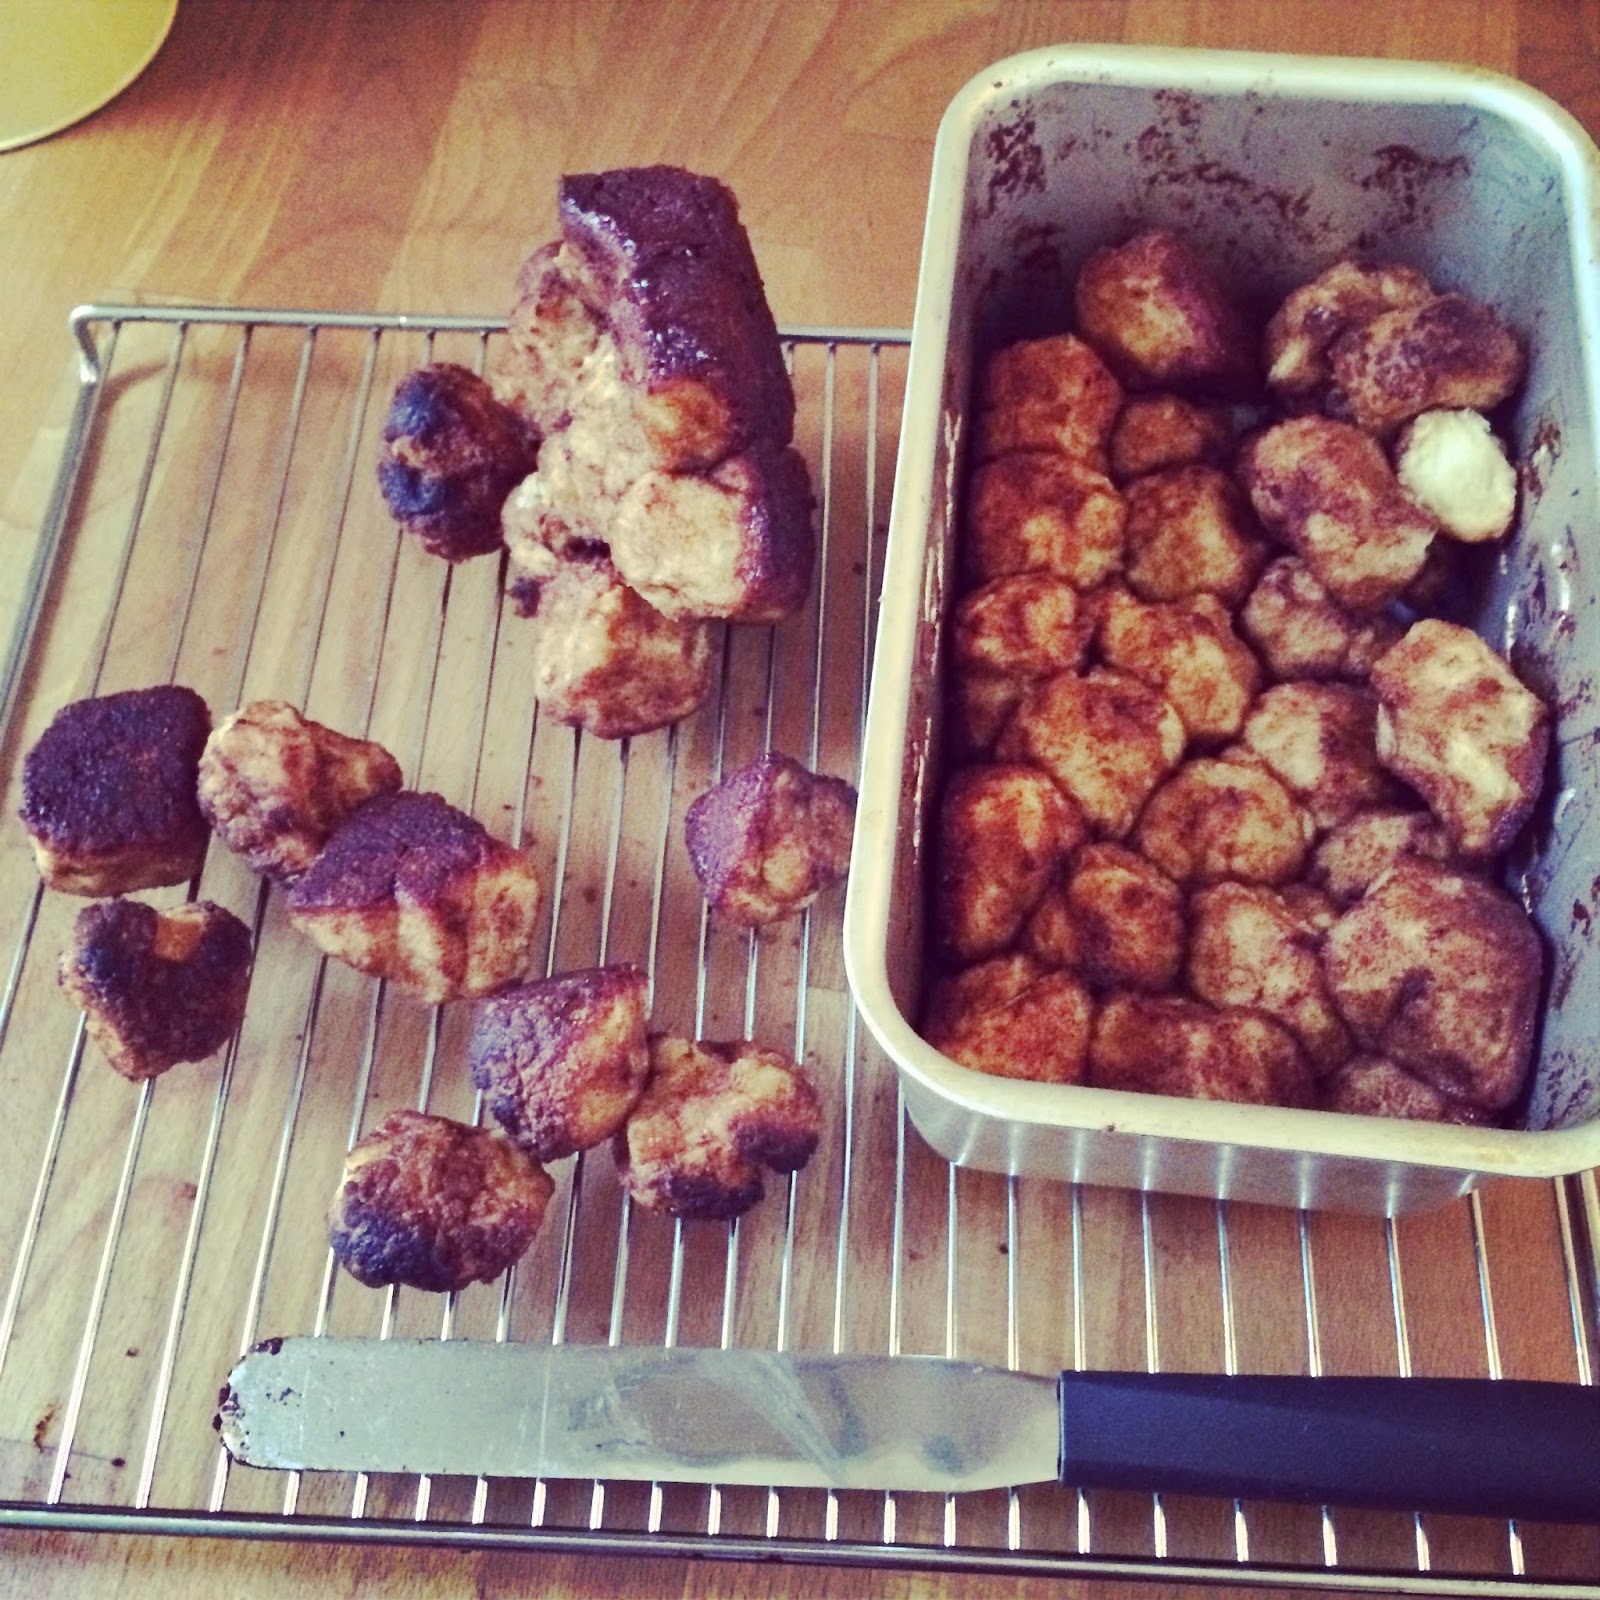
NOW. this is where you should be looking at a beautiful loaf of bread, salivating at the heavenly cinnamony aroma and trying to cut it before it's even cool enough. My results did not allow for this…

This is genuinely my favourite baking disaster ever- I considered sending it into An Extra Slice to have Jo Brand mock me. I genuinely believe a tin liner and my house being about 10C warmer would have helped avoid this…but I just had to deal with eating some genuinely tasty cinnamon dough balls…silver linings and all that!

Whats your most disastrous bake recently? Have you any tips for making monkey bread?

Thursday 21 August 2014

Building my MAC Palette #1


Aren't I the greatest photographer in the world?! Unfortunately the new lid on these palettes makes photographing them closed a challenge…my David Bailey-esque prowess (or lack thereof) aside, we're talking MAC eyeshadows! Pretty much every beauty addicts favourite topic- am I right?! The pigment, the range of colours, the general wonder. They're glorious. I'm physically incapable of leaving a MAC counter without a multicoloured hand and a new lust list. 

Luckily my lovely friend Nikki over at Nikki and Things shares this compulsion and got me started with my very own palette for my birthday last year. She started me with 8 great shades that she loved and I too have grown to cherish them.
Top Row: Cranberry, Satin Taupe, Shroom
Middle: Sable, Patina, Woodwinked
Bottom: Copperplate, Wedge

L-R: Cranberry, Sable, Copperplate, Satin Taupe,
Patina, Wedge, Shroom, Woodwinked
Now I'll admit, I'm not the most adventurous with my own eye make-up. I love a bit of Patina or Sable and Satin Taupe. Or Copperplate and Wedge for more day to day eyes. And Bobbi Brown gel liner (and ode to that wee beauty coming soon).

But if I'm at college (I'm doing a HND in make-up artistry) or doing freelance-y stuff, I'm all about that Cranberry. It's gorgeous. Especially mixed with a bit of Satin Taupe *swoons*. It's just the right balance between pink and a kind of burnt terracotta. It's basically the love of my life.

Shroom is a beautiful highlight shade, with just enough shimmer - no disco ball brow bones here thank you - to accentuate that arch. However, I do find myself longing for a matte option for daytime…Apologies again for my poor camera skills- DSLR is on the horizon! 

I neglect Woodwinked terribly. I love it but I seem to finish my eye make-up every time and then remember it. I'm endeavouring to show it some love in the near future...

So I have made it my mission to finally finish this palette…and then start another one. I'm aiming to have one all matte palette and one all shimmer. With a range of shades in each to cover any eventuality… #makeupartistprobs…

So are there any shades you would recommend? Or any way you love to use the shades above? I'm so excited about finally filling this bad boy!

Thursday 14 August 2014

Bake Off Week 2 - Biscuits

Ah the dreaded biscuit. This and pastry week always leave me the hungriest and the most impressed. Any biscuits I make (as you will soon see) tend to turn out a bit hap hazard in size and colour…no one seems to care because it's still a cookie. But Paul and Mary see differently. Bit picky really. But ANYWAY! Biscuit week. I pulled out my Great British Bake Off: How to Bake book (by Linda Collister) and decided to attempt some Chocolate Crackles. 

Now fair warning before we start, the mixture needs an hour in the fridge so just bear that in mind!


Ingredients

100g dark chocolate 70% cocoa solids is best- milk chocolate makes them too sweet.
100g unsalted butter, softened by softened I assumed they meant a few seconds from melting.
150g light brown muscovado sugar
1 large, free range egg
1/2 teaspoon of vanilla extract
175g self raising flour
1/2 teaspoon bicarbonate of soda
2-3 tablespoon icing sugar

Prep a couple of baking sheets- either grease them or line them. This recipe apparently makes 30 cookies. I got 12 but I like a large biscuit…


1. Gently melt the chocolate- best way is in a bowl over a pan of boiling water but carefully watched in the microwave is fine too. When it's melted, add the soft butter. Stir until the mixture is completely smooth and then add the muscovado sugar. Leave the mixture to cool for 5 minutes.

2. Beat the egg with the vanilla until just combined, then add that to the bowl. Then sift in the flour and bicarb and mix like your life depends upon it. It's quite a sticky mix. Cover it with cling film and pop it in the fridge for about an hour.

3. This is your opportunity for bowl and spoon licking. Take it. It's a tasty raw mixture.


4. Preheat the oven to 200C/400F/gas mark 6. Divide the dough into even sized portions and roll them into balls. Apprently 30 but we're not making toddler sized cakes, in the words of Joey what are you afraid you'll run out?! Cut me a real piece!! … anyway! I made 12 but I think 18 would be reasonable. Put your icing sugar into a shallow dish and roll each ball in it to coat thickly. Place them on the baking sheet spaced well apart. Now these things spread for miles. And I cannot stress this enough; DO NOT flatten these down. I did this and I ended up with extremely flat, albeit tasty, biscuits. I'd suggest the lightest of touches to flatten the base. then walk away!!


5. Bake for 10 minutes (watch them after 8) for a softer biscuit. 12 minutes for something crunchy. I went soft and they were yummy if i say so myself. Leave on the sheets to cool for a minute then transfer to a wire rack to cool completely and they'll firm up as they cool. 


Now apparently these will keep for 5 days - they'll be lucky to last 2 in this house. Next time though, I need more icing sugar, smaller pieces and less flattening. Lessons learned!

Next week is bread week so I shall be flexing my muscles for that! 

Are you enjoying the bake off? Who are you rooting for?

Wednesday 13 August 2014

Ultimate Chocolate Brownies

It's Bake Off Day! So I have decided that I will try and post a weekly recipe. This week is the ultimate chocolate brownie. I have been making these for years and get asked for the recipe all the time. So I'm sharing it with you! It's originally from You magazine about a million years ago and is the work of Gary Rhodes :)


Ingredients

280g caster sugar
4 eggs
225g unsalted butter
75g cocoa
75g plain flour
225g plain chocolate
115g white chocolate- cut into chunks
115g hazelnuts or pecans, chopped (I always miss these out but y'all go ahead and add them if you like!)


1. Preheat your oven to 180C/350F/gas mark 4 and line a 20cm/8in shallow square brownie tin. Or an Edge Brownie Pan if you're one of those people (read:weirdos) who prefers the edges of a brownie to the middle squidgy bits!

2. Beat together the sugar and eggs until the sugar has completely dissolved. Melt the butter and then whisk it into the sugar and eggs.

3. Sieve together the cocoa and flour and add it to the butter and eggs mix.

4. Melt the chocolate in a bowl over a pan of hot water (or in the microwave if you want to save some washing up) and then add to the mixture. Add the nuts and chunks of white chocolate and stir until they're well dispersed. Turn the mix into the tin and bake for 25 minutes (closer to 20 if you like them squidgy in the middle). Leave to cool a little and then cut into squares (a word of caution: these are deadly. Go for small squares).

I personally like to have these slightly warm with some vanilla ice cream.

Hope you enjoy! Is there anything you do differently? Any recipes you'd like me to post?